So you want to know how to start your own bucket list blog? Yay—I am happy to hear that because mine has completely changed my life and has allowed me to turn my passion into a career! The good news is that there’s plenty of room for you to be a successful blogger too and beginning is actually easier than you think.
This blog started way back in 2009 when there wasn’t a lot of information out there, and that led to making a bunch of beginner blogging mistakes. But after 10 years, I’ve learned a few things about being a blogger, and I want to share them with you because the more people out there living their bucket list the better!
Why Trust Me?
I started Bucket List Journey over ten years ago and have worked my butt off since to figure out how to make it a success. It now has almost 500,000 pageviews per month and currently earns me a six-figure income (which is continuously growing—woot! woot!). The site has been listed on several “top blog” lists and featured on reputable sites like the New York Post and Travel Channel (you can visit my Press Page for a full list).
Your dream of writing a blog is not impossible and I am not just “lucky”—anyone with passion and dedication can do what I am doing. This free how-to guide will show you how to start a blog cheaply and quickly, using all the tools and techniques that have helped me create this successful site.
Wondering How to Become a Blogger? Here’s How to Start a Successful Blog.
1. Choose a Blog Name
Choosing a blog name initially may seem like it would be the easiest part of this guide, but there’s actually some serious thought that needs to be put behind it. Don’t make the same mistake as me! In the very beginning before my bucket list journey was actually named ‘Bucket List Journey’, my blog was called MsListologist. What’s wrong with that you ask? Uh, actually a lot. It’s hard to spell, it’s hard to say and doesn’t really define what my blog is about. Plus, my main keyword (“bucket list”) is not in the title, which can lose potential Google search traffic.

How to Choose a Blog Name
It’s best to do your research and pick the right name from the beginning, because changing it in the future can be tricky (and expensive!). There are a few key things to consider when picking your blog name (and I wish I knew half of them when I first started!).
1. Make it Easy to Spell, Say & Pronounce
This may have been one of the biggest mistakes I made when choosing the name MsListologist—it wasn’t any of these things! Every time someone asked me the name of my blog so they could pay it a visit I would have to say the name at least twice, pronouncing each syllable slowly and following that up with spelling it multiple times. You can imagine how quickly people lost interest! Choose something that is short, simple and easy to remember. Stay away from words that are not common and therefore would be difficult for people to spell.
2. Don’t be too Specific
Make sure the name encompasses everything you want to do now, and in the future. Don’t be too specific with the niche in your name because you don’t want to limit the future potential of the account. For example, naming this site “USA Bucket List Journey” or “The Ultimate Under 30 Bucket List” would have limited me in the future if I wanted to include bucket list goals outside of the States or as my age passed into the forties or fifties.
3. Use Your Main Keyword in your Name
Google wants to know what your blog is about. It can tell this by the articles you write, but also when the articles you write relate to your blog name/url. It is one more opportunity to get into Google’s good graces and rank higher for that keyword whenever someone searches for it (which is really important for getting traffic!). For example, my main keyword for my blog is ‘bucket list’.
How do you choose your main keyword? Ask yourself what is your blog about and how competitive is that market. How may blogs in that niche are there? The more there are the harder it will be for you to stand out in Google. For example, if your blog is strictly about bucket lists, ranking for the words bucket list on its own is pretty competitive, but you can try adding a word or two to it, like bucket list goals or bucket list ideas. Or check out different terms that mean bucket list, like life list or dream list. For more advanced research, you can use a tool that calculates sites online to specifically tell you how hard (or easy) it will be to compete for keywords. I use a site called Keysearch and this is what a basic search for the term bucket list looks like:
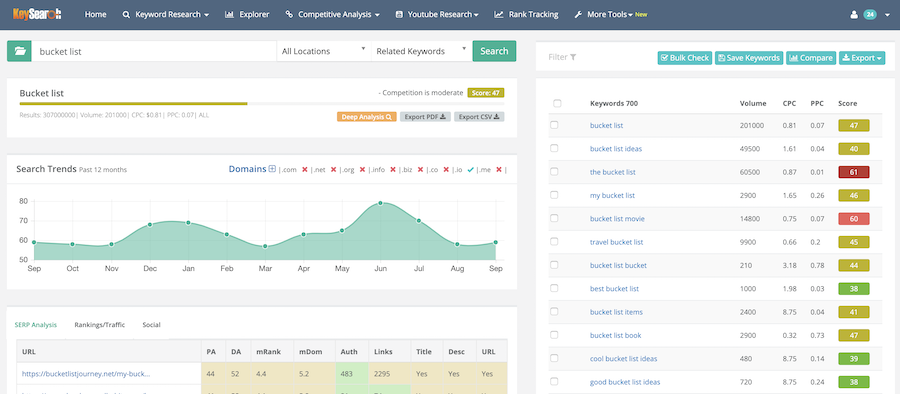
Reading this can be tricky, but basically when looking in the right hand column any term in red is highly competitive, and green is a bit easier.
4. Check the Name’s Availability
After you have selected your blog’s name it’s time to see if the url is actually available. You can do this by going to Domain.com and doing a search for your chosen url. Just put it in the search box and press enter. It’s always best to get the .com version of it, followed by the .net. I’m sorry to give you the bad news, but chances are that your first choice for a name will already be taken—don’t get discouraged! Domain.com will have a bunch of alternatives that are available, but you can also do a few other things if your first choice is not possible.
- Check the thesaurus for catchy alternatives
- Try adding words or letters, like “the” or an “s”
- Switch the order of the words in your name and see if they still can make sense.
5. Check Name on Social Media
Once you find yourself an available name, see if it is something that is available across all social media channels. Most bloggers are really active on at least one social media platform, many are active on at least two: Twitter, Facebook, Pinterest and Instagram.
It’s great if you can get your exact blog name on your chosen social media platforms, but you may have to settle for something close. For example, on Twitter my handle is @bucketlistjrny instead of @bucketlistjourney due to the restriction in the amount of characters a handle can be. But, don’t have too many different variations of names/handles because it will confuse your fans.
2. Take Your Blog Online
Buy the Domain
So you finally found the perfect name for your blog, now it’s time to snag the domain so nobody else can! The domain is your blog name followed by the .com, .net, .org, etc. (for example, bucketlistjourney.net is my domain). This is totally separate from getting your blog online with hosting (that’s up next!). There are many companies that you can purchase a domain name through, but Domain.com offers an easy searching tool that recommends other options when your first choice isn’t available.
Though you can purchase your domain through this website, I recommend buying it through the hosting company you choose so everything will be nice and tidy in one place. You pay a yearly fee for these domain names, though you can opt to pay for multiple years at once. It shouldn’t be too expensive, typically under $20 per year.
If you can get the .com for your blogs url that’s great! But if you can’t, that shouldn’t be a dealbreaker (I don’t own the .com for mine). Try for the .net, .org or .co. If more than one extension is available you might want to consider buying more than one. This way no one else will take it!
Choose Hosting
In order to get your blog up and running on the web, you will need to find a hosting company to put it there. Think of a hosting company as a service provider who you pay a fee to in order for your blog to be viewed on the Internet. I know you heard the word “fee” and are wondering if you can find hosting for free? The answer is yes, but you may want to think twice before doing it.
Should I use a free hosting site? It’s definitely tempting to first start with a free blog because it’s less risky, and it does come with its own benefits, such as being quicker to set up and a little easier to maintain. However, if you plan on turning your blog into a business, spending a little money in the beginning will give you a bigger return, and here’s a few reasons why:
- A free site has a subdomain, so your domain would be yourblogname.freebloghost.com, instead of yourblogname.com. The latter of the two looks more professional, giving you more credibility.
- Earning money with advertising will be very limited on a free site, most don’t allow ads at all since they place their own ads on your site in order to pay for the free hosting costs.
- You will receive limited analytics and insights, something you need to be concerned about when working with brands.
- If you’ve seen another blog with some cool features, like heart shaped share buttons or an Instagram scroll, you may not be able to do the same because customization options using plugins will be limited.
- If you eventually decide to switch to a paid account, the transition won’t be as easy as you think. You will need to have all your posts migrated to the new account, and hopefully without losing any of the Google headway you may have made. I had to hire someone to do it for me.
Just like domains, there are dozens of companies to choose from when hosting your site. Let me start by saying that no host is perfect—all will occasionally have their glitches and downtime. So it’s really smart to choose one with great customer service.
For the first 9 years of my blog I used GoDaddy to host my site. Truth be told, the company gets a lot of crap for not being the best, but I had limited problems for years considering my site was heavily trafficked with almost 500,000 pageviews per month. Was there downtime? Yes. Maybe for an hour or two every few months. Was there glitches? Yes. But, nothing tech support couldn’t figure out (though a couple times it took calling more than once).
With that said, I have now switched my hosting over to SiteGround and here’s why:
- They are recommended by WordPress (so is Blue Host, another popular hosting site).
- The SiteGround hosting software updates coincide with Wordpress updates so there is less likelihood of a lag time which means less likelihood of things interacting poorly (which means less downtime!).
- SiteGround is known for their stellar customer support, and that is hugely important when your blog becomes a business and every hour of downtime means less earnings.
Installing Wordpress Platform
I know it’s getting confusing, but stay with me. Besides hosting you also need to choose a blogging platform. This is the software used to write your posts, add plugins and widgets. The industry standard is Wordpress, it is what I use and recommend. The above mentioned hosting companies offer an easy Wordpress hosting upload when you initially sign up. Here’s what SiteGround options look like:

For a beginner blog, it is fine to start with the lowest package and update as your blog grows.
Create Social Media Fanpages
Though it is not mandatory to have social media accounts with your blog name, it is wise in order to reach more people and establish your brand further. You should have already researched availability, but which one(s) do you choose? Most brands I work with like to see an Instagram account at the very least, followed by Facebook and then Twitter. With that said, when used properly Pinterest gives the most referral clicks to my blog. So, if you can only manage 1 or 2, go with Instagram and Pinterest. I’d also recommend opening accounts on all social media under your blog name, just to secure them, then start using whichever you feel you could be most active on.

3. Customize Your Blog
Choose a Theme
The theme of your blog controls things like the color palette and layout. To begin, Wordpress will install a generic theme, but there are so many more to choose from (like 1,000s!). It’s okay to use one of their free ones at first until you get the idea of how to blog and what types of theme options you’d like to have. But, then I’d purchase a responsive & more customizable theme, mine is the Avada. With a customizable theme like Avada, you have control over branding colors, fonts and layout. Plus, the responsive feature allows it to look good whether it’s being viewed on a laptop or smartphone. Not sure? Here are 25 examples the Avada Wordpress theme.
Install Plugins
Once you’ve got the blog up and running, you should add some plugins to make maintaining the site easier and to give it your own personal flare. A plugin adds new features and functionality to your theme, very similar to apps on your smartphone. Just be careful about adding too many because they can slow down your site and potentially interact poorly with your theme. Choose ones that are common and have a lot of reviews.
Some of the best to start with are:
- WP Google Analytics: A vital tool to keep track of the traffic coming to your blog
- Akismet: Protects your site against spam comments
- Yoast SEO: A search engine optimization tool for Wordpress
- Looking for more? Read the 24 “Must Have” Wordpress Plugins for Business Websites.
Organize Your Widgets
Widgets relate to how features and plugins are displayed on your site’s sidebar, header or footer. Wordpress comes with some default widgets (like recent posts, tag clouds and search bar), but certain plugins will also have their own. For example, if you download the Interactive Map plugin on your to your blog, you would go into the widget tab to rearrange where on the page the map would be viewed.

Create Standard Pages
Blog pages are different than blog posts—pages are static, timeless content and posts are articles arranged in reverse chronological order. Common pages for blogs are about, contact and disclosure. You can read a detailed description of pages vs. posts on ProBlogger.
In the lefthand column of your blog’s dashboard you will see a tab for “pages”. All you have to do is click on “Add New” to create a page.
Create Categories
Even though most blogs have a main niche, they typically have little sub-categories under that main umbrella so readers can find things easily. For example, if you have a bucket list blog that is heavy on travel and food, your sub-categories may be Bucket Lists, Travel, Food Experiences and Packing Guides. A more general bucket list blog may have Bucket Lists, Travel, Sports, Adventure, Food and Creativity.
Here’s a screenshot of my pages and categories:

Setup Your Email Signup Service
Even before writing your first post you’ll want to setup your email subscription list to make it easy for people to signup to receive emails from you. It is one of the main ways with which you’ll be connecting with your audience, promoting your products and building an active following.
Email service companies are their own separate providers (different from hosting). By putting a signup box on your blog, they can automatically collect and store your emails, and send newsletters to your subscribers. My email service provider is Aweber, but ConvertKit and Mailchimp are also very reputable.
After you sign up with your chosen one, it will walk you through creating an email signup box, downloading code and installing it on your blog.
4. Write Your First Blog Post
Most people think that you need to be some award-winning writer to start a blog, but that’s really not true (English was definitely not my best subject in school!). Just concentrate on writing your articles as if you were telling the story to your friend (minus all the swear words ?). More than just telling a story, remember that people visit blogs for information, and it’s a bonus if you can give that information in a fun and engaging way. Your post should answer all the questions that your reader might have. For example, if you write an article about hiking the Inca Trail to Machu Picchu you could include the following in order to help your reader achieve the same goal:
- What tour company you used
- Things to pack for the hike
- The best hiking poles to use
- What to expect from camping along the trail
- And so on…
Most of the time your article is getting read because someone wants to do the same experience or own the same product—make sure you’re the one to help them with these needs whether it be by explaining it yourself or giving them links to where they can find the information.
A few more tips on writing blog posts:
- Write in Bite Sized Chunks
Most people have short attention spans and will just scan a post for the pertinent information that grabs their attention. They don’t want to read long drawn-out paragraphs. Make sure to leave space after ever few sentences and use bullet points to break up the information when possible.- Add Photos
Give your readers something pretty to look at on the page besides a bunch of text. Add photos that explain what you are talking about. My posts are photo heavy, sometimes there’s almost 20, but you should use at least 3-5.- Don’t Rush It
Executing the perfect post takes time—lots of time—don’t rush it. You are going to be excited and want to publish something right away, but take your time and make sure that it is right. This will save you many hours having to fix posts in the future.
Publish Your First Post
After you’ve previewed your post and it looks great, hit the publish button! If you’re anything like me, you will then continuously check your stats to see how many people viewed your very first article. And, if you’re anything like me, it won’t be many because you haven’t built a readership yet. That’s where promotion comes into play, so read on.

5. Ways to Promote Your Blog
It takes lots of time, dedication and passion to build an audience. For me, it was at least two years before seeing any significant progress in visitors to my blog and four years before actually making any money at all. Thankfully, with all the resources available (and this step-by-step guide!) it can now happen a lot sooner, especially if you promote each post you write.
Email List
Send your blog posts to everyone on your email list. You may choose to do this each time you write an article or combine multiple ones in a fun newsletter. If you are writing several posts per week the latter of the two is a better option, so you don’t annoy people with too many emails.
Promote on Social Media
During your blog set up phase, you started some social media accounts/fan pages under your blog name, and now you are going to put them to good use. Share your blog post on all your social media accounts. This gives you the potential to reach more than just the people who are only reading your blog. Sharing on these accounts once is usually not enough, schedule sharing every few months.
Another trick is to tag anyone mentioned in your article. Companies and brands love when people are talking about them, and may share your story because of it.
Commenting on Like Articles
Do a Google search on the subject of your article to find similar posts online. Go through each one to see which allow comments with a linkback to your blog. It’ll look like this:

For those ones, leave a valuable comment (never just say something like “nice blog post”). Add your opinion and find opportunities to insert additional information that the article may have missed. Someone reading the article who is interested in the topic may just click on your comment which will lead them straight to your blog.
SEO
SEO (Search Engine Optimization) relates to how your blog post will rank in Google when someone searches keywords in your article. For a newer blog it will be hard to rank high in searches because you haven’t built any credibility with Google yet. But, you should still try to do your best to have your post SEO friendly so you don’t have to change things in the future. You can use plugins like Yoast SEO and websites like Keysearch to aid you in forming SEO-friendly posts, but this is an extensive topic. The best advice I can give is to read Moz’s Beginner’s Guide to SEO and the blog Digital Nomad Wannabe. Both were invaluable to me!
6. Making Money
I’m going to be honest with you, making money blogging is going to take time. If you think it is going to happen after writing your first post, think again. It typically takes a while because you need to have a readership in order make money and that means you have to write quite a few quality posts. With that said, you’ll want to have all the groundwork in place, so when the visitors start coming you are ready to start earning, and here’s a quick overview of the things you can do:
Affiliate Marketing
Affiliate marking is often the first and easiest way that bloggers make money. This form of advertising is when you add a special product link somewhere on your blog and then when someone makes a purchase using that link, you’ll get a small commission! Just make sure you are recommending quality products or you’ll lose your credibility quickly.
Not all, but many companies and products have an affiliate program (just search for “[product/company name] affiliate program”). You’ll find that some have their very own program that is accessed on their site, while others join a larger network that represent several companies. Here is a list of my main affiliate programs:
Most are really easy to set up: mention services or products relevant to what your blog is about, enroll in their affiliate program if they have one, and start adding relevant affiliate links to your posts, pages, and newsletters!
Sponsored Posts
Once you’ve managed to fill up your blog portfolio with material and raised a nice number of visitors, brands will start contacting you for sponsored content (so, make sure you have your email on your blog!). A sponsored blog post is when a company pays you to talk about their brand or product on your blog.
If you don’t want to wait for them to come to you, you do have a couple choices. You can pitch companies directly or join sponsored post networks that are like agents working for brands. If you want to pitch yourself, you’ll need a media kit that includes your brand information and stats. There is no real protocol except your pitch should be professional and you need to remember that they are going to want a return on investment (ROI), so you need to make sure whatever you are offering is legit and you’re not just after free stuff.
Joining sponsored post networks is a little bit easier, but be prepared to weed through all the companies that you may not be interested in.
There are dozens of these networks that you can join, but here are the top ones that I belong to:
Every sponsorship is different, sometimes it’s a product in exchange for exposure and sometimes it’s paid. Each contract and negotiation is different and you have to determine what you feel comfortable with.
Ads
How many times have you seen those long banner ads at the top or bottom of a site you’re visiting? These are placed there by an ad network. A couple major ones are Google Adsense, Media Vine and Adthrive (I use the latter of the three). You can make some very good money having these style ads on your site, but most of the bigger ones won’t work with you until you have at least 25,000 pageviews per month, so Google Adsense may be a good start for you.
Press Trips/Goal Sponsorships
This type of money making opportunity is my favorite! After gaining some traction on your blog you can form mutually beneficial partnerships with tourism boards, tour companies and other relatable businesses who will send you on a press trip to their destination or sponsor one of your bucket list goals. For example, a city’s tourism board will partner with me to write a “bucket list” for their destination or a ski resort may partner with me to check “learn to snowboard” off my list. Just like with sponsored posts, the deliverables will need to be negotiated for each partnership.
I hope you’ve learned a lot from this “How to Start a Blog” guide and that these tips will be of great help in getting your own blog up and running! Remember that success, especially in today’s blogging climate, doesn’t happen overnight and that you absolutely need to be having fun while writing, despite all the hard work you’ll also have to put in.
This post may contain affiliate links. If you make a purchase through my links, I earn a commission that helps to keep this blog running—at no extra cost to you. For more information read my full disclosure.
You Might Also Enjoy
Financial Goals Bucket List: 21 Short & Long Term Ideas
75+ Simple Ways to Save Money for Your Bucket List
Blogging 101 Tips: 10 Beginner Mistakes to Avoid (& How to Fix Them)
29 Bucket List Goals That Can Actually Save You Money
How to Make Money Blogging: 7 Ways to Monetize

Hi Annette, very good information provided for beginners. Once i started a blog, my focus only on money. Later what happened later is worse. I’m not able to run the blog. I closed it.
My advice to new bloggers. First you should give information that are helpful for others. Later Money will come to your pocket.
Choosing domain name is a main factor. You can take even 30 or more days to make a research on it and buy your domain name.
That’s good advice!
I am looking for tips to start my own goals and bucket list site for travel and thanks for the tips you offer in this piece. Having said that, I do use Siteground on one of my WordPress based websites and they are a solid hosting company. Definitely recommend. Thank you for the post, again.
Good Day. It’s a good guide about blogging but I’m running my blog from one years. I write about student help, like assignment help, essay writing help and exam tips, etc. You’ve explained very briefly too. I’ve learned more awesome and helpful tips from your guide.
It’s motivated me :)
Hi Annette
Whilst we started our own travel blogging journey 12 months ago its always valuable to read differing opinions on set up a successful blogs. Some tips that you’d think would be straightforward always seem to be overlooked – like having a contact e-mail on the site!
The assurances over time required is also very helpful as it makes everything realistic.
Thanks again
Hi Annette,
Such useful advice here! I am just starting to see some (very) small amounts of traffic to one of my blogs and am wondering what affiliate programs have converted well for you. I see you list all the major ones here, but wondering what you’ve had first hand success with. Thank you so much!
My main money makers are Get Your Guide, Amazon and Booking.com (in that order). I make a little bit from others. Hope that helps!
Hi, I wanted to thank you for your blogging advice. I have reread your posts several times and have been using your guidelines. Your instructions are easy to follow and detailed. I am just starting out as a travel blogger and wasn’t sure how to begin. The information regarding choosing a site host and blog platform were invaluable as well as list of things not to do. I’m sure I will be rereading these posts again as I get to each phase.
Congrats on starting your travel blog and I’m happy to hear that my advice has helped :)
I actually have some friends who love my site and want advice so I am going to share your post to pay it forward.
Thanks so much for this! It was super helpful and informative.
I am researching all of this right now!
Hi Annette, thank you for the generous information you have provided regarding how to become a blogger, it’s actually really motivational and make you excited to start straight away. I really want to start my blog regarding travel, however I don’t know how to gather my content and what exactly to write. There are millions of things that come ansd go through my mind. I would like to ask you, how you gather your materials for writing an article and do you use other sources or its all based on your personal experience. I will be really grateful if you can enlighten me regarding this matter. Thank you.
Regards
Kristiyana
Hi! I mostly write about first hand experiences that fit into my niche. What was helpful for me was to write a mission statement for Bucket List Journey (which is: Bucket List Journey gives the tools and inspiration for every person in the world to live their bucket list), then I broke the mission statement down into categories that I wanted to write about (bucket lists, travel, motivation and money). Now every article that comes to mind, I make sure that it fits into both my mission statement and one of the categories. I try to rotate topics too, just so its not all travel for months and then motivation for months. I hope that helps!
Thank you,l Annette, that was very useful advice, indeed.
Admin of this blog deserve an expert motivation reward